Wednesday, December 31, 2014

Blog Changes For 2015

Hello and happy new year.  It is 2015, and I would like to apologize to my readers that I haven't been posting for the past nine or ten months.  I also have an announcement to make about blog changes.

For blog changes, I wanted to focus on reality more than fantasy, which means I'm going to focus less on the No Limits 2 software (I'll still try to do some No Limits posts).  But I want to talk more about real theme parks and real roller coasters.  It's one thing to create fake rides on your computer but it's another to physically ride them.

My idea was to write reviews on theme parks that I'll go to in the future.  I'm making a five-year plan and I have a list of parks that I plan to go to within that time frame.  This summer, I plan to go to Adventureland in Iowa and my hometown park, Valleyfair in Minnesota.

That's all that I have for this post.  I hope you stay tuned for future posts of my blog.

Thanks for reading.

Sunday, February 23, 2014

How to use No Limits 2, Tutorial 3, Dips, turns, roll points and triggers

Hello again and welcome to tutorial 3 on how to use No Limits 2.  This lesson is going to go over making dips, turns, roll points and triggers.

You know the drill.  Open up NL2 editor, open your park file and select the coaster you left off on.
We'll start off with making a dip.  Go to Track tab and click Add Vertex.
Then place the vertex at a lower height.  And then place the next vertex higher than the previous one to make the track go up.
 Now to make a turn.  You can use the previous vertices made or add more to make a turn.  What you do is change the point of view.  So I'm going to change it from the Right to the Top.
 Then in the Track tab, go to Select/Modify and select a vertex.  Then click and drag to the left or right.
To make a banked turn, stay in the Track tab and choose Add Roll.  Then click them on the track at the place you want them.
 Double click on the Roll Point. and this window will pop up.  This is were you can tilt the track left and right.  See the buttons + 45, + 10, = 0, - 1, - 10, - 45? those are where you enter how steep to tilt the track.
Now for triggers.  The trigger is a setting used on the spinning and suspended coasters.  To add a trigger, go to Add Trigger in the Track tab and place one on the track.
 Now double click on the Trigger and the Trigger Settings should pop up.  There are four options.  Unlock Spinning, Lock Spinning (Spinning Coasters), Unlock Swinging, and Lock Swinging (Suspended Coaster).
Now click Apply.

Well that's it for this lesson.  If there's any questions about the tutorials or if you don't understand something, be free to leave a comment.  Thank you for reading.

Saturday, February 22, 2014

How to use No Limits 2, Tutorial 2, Adding a lift hill.

Hey it's Nick again.  I am going to continue with the second tutorial on how to build a NL2 coaster.  In this tutorial, I will show you how to make a lift hill.

To get started, you open No Limits 2 and click on editor.  Then go to File, Open.  Then you find the project you're working on.  Then make sure you have your coaster selected.
 Now to continue, you go to the Track tab and then go to Add Vertex.
 Then you place the vertex (the blue dots) where needed.
 Keep adding vertices to make up the lift hill.
 Now make sure your straight part of the lift hill has at least three vertices.  This way, you can select each one and then click on Make Straight. 
 Then add a Type Separator and go to Section Type, Lift
Double click on the lift hill segment to open the Lift Section Settings menu.  This is where you can set the lift hill speed, the type of lift system (chain or friction wheels) to use.
Always remember to File, Save.  During, and after working on it.  It makes it less likely to loose the information you have worked hard on.

That's it for the lift hill tutorial.  The next tutorial coming soon will talk about making banked turns, drops, hills and more of the software's tools and features.  Thanks for reading.

Friday, February 21, 2014

How to use No Limits Simulator 2, Tutorial 1, Getting Started & Building a Station.

Hello.  I'm Nick Bonneau, and I'm here to show you how to get started on No Limits 2.  Starting a new roller coaster on NL2 is easy and fun.  In this tutorial, I'm going to show you how to start a new coaster and build a station for it.  I will be having other tutorials on building a No Limits 2 roller coaster very soon.
Lets get started.

The steps will be explained with words and pictures.
 First, open up NL2.  And go to the Editor.
 Go to File, New.
 Name your new park.
 Confirm to making a new park file.
 Go to the Coaster tab on the top (the one highlighted in blue) and click on New Coaster.
 Name your coaster.
 Then in the Coaster tab, go down to Coaster Properties.
 In the Coaster Properties menu, there's 7 different tabs.  The Style tab shows a list of available wood and steel coaster styles.  For this one I'm going to choose the Arrow Dynamics Suspended Coaster
(popular back in the 1980-90s)
 The Mode tab shows the three available operation modes.  Closed Circuit, Shuttle and Scripted.  Now Scripted mode I've never tried because it involves some complex steps.  For this one, I'll go with Closed Circuit.  The other things in this tab don't really matter. so leave them alone.
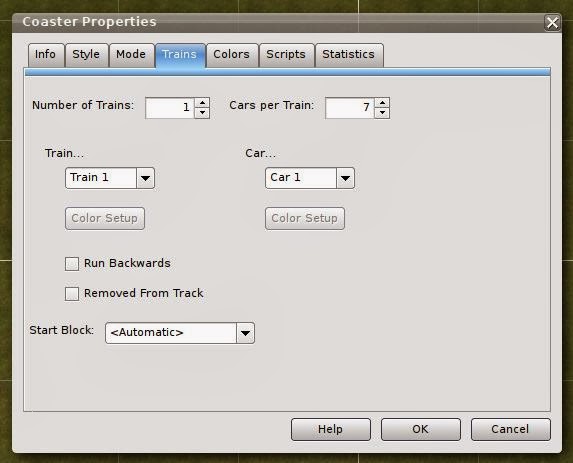
 The Trains tab lets you adjust the amount of trains and the cars per trains.
 The Colors tab lets you choose the colors for the track, supports, trains and catwalks.
 For now we'll skip the, Info, Scripts and Statistics tabs, and say OK for the Coaster Properties.
 Now to get a straight piece of track for the station, you go to the Elements tab and click on Add Element.
 Click on Straight Formula.  And then click OK.
 Enter in the length of the track you want to put in place.  Making sure it's more than long enough to hold the train in the station.
For this step, just click OK. 
 Now you have your piece of track.  Now you probably want to move it up a little higher.  To do that, just go to the  right almost to the top.  Click on that, and you get you different point of view options.  For this, just click on Left or Right.
Now to move your track segment, you have to highlight it.  Afterwards, click and drag it in the direction needed.
In the Track tab, go down and click on Add Type Separator.
Add your Type Separators by clicking on the specific spot of the track you want it on.  After that, go to Section Type, then to Station.
To get to your Station Section Settings, double click on the station segment.  This menu will have four tabs.  Mode, Wait Time, Brake Device and Transport Device.
In the Mode tab (previous picture), you have your station layout settings.  In the Wait Time tab, you can set how long the trains stay at the station.
In the Brake Device tab, you have your brake settings for the station.
The Transport Device tab lets you adjust the station launch settings.  You can also disable the Transport Device as an option.  However for your coaster to work then, you would have to tilt the track downwards.
Remember to save your project while working on it and when you're done.  This way you are less likely to loose what you have worked on.  Just go to File, Save.

This is all I have for now.  I will be posting a tutorial on adding a lift hill later tonight or tomorrow.
Thanks for reading, Nicholas Bonneau.

Thursday, February 20, 2014

My first project is almost complete

Well, I'm almost complete with my first No Limits 2 roller coaster project.  Remember the purple coaster with the yellow trains that I named Storm?  I was talking about it in my second blog post.  I was also talking about including a second coaster in that environment by the name of Ultimate.  I finally got Ultimate's track layout completed.  The only thing I have to do now is add the supports on both Storm and Ultimate.

Here's some pictures

The layout seen from the top of the lift hill.
 Ultimate runs with four trains.  Two white ones facing 
forwards.  Two black ones facing backwards.
 Ultimate's turn-around seen on Storm.
 One of the trains flying by.
 Flying by a high-speed curve.
The layout seen from the final hill.

Now just some general information about Ultimate, it is over 300 ft tall and goes around 90 mph top speed. Unfortunately the ride is only around 4,100 feet in length.  Which is pretty short for a coaster of this type. Also I wanted to tell you that the trains fly down the track.  From the first drop to the brake run at the end, this ride keeps its speed over 55 mph.

This is all I've got for now.  I'll keep you updated on this project, and many others that will come along in the future.  Thanks for reading.

Sunday, February 16, 2014

My High School Life & My Dream Job

Now for many of you who don't know, I go to high school.  I am a senior at high school which means it's my last year of school.  I currently have no plans about going to college.  I mean I would like to learn how to become a roller coaster designer for an actual company.  However, there's a couple things in the way of that. 

First off, I have very poor math skills.  Because of this, the engineering of the rides would be difficult for me.  Also because of where I live, it would be inconvenient for me to move somewhere where there is a ride design firm.  Especially with poor math skills and no money to get there. 

The reason I can design some pretty cool coasters is because the software I use is not only realistic, but is easy to use.  If it wasn't for No Limits 2, I wouldn't be writing a blog right now.  So yeah.  I think I'll just do this as a hobby and write about my progress.

What got me inspired to start writing this blog would be the advice from one of my school teachers.  She was talking about how she was writing a blog about her bike racing.  She told me that writing something I'm actually interested in would probably be a good idea.

During 4th hour at school after lunch, me and a couple of friends would talk about theme parks while walking the indoor track.  One of my friends mainly talks about Disney Parks and sometimes about Universal.  My other friend who used to live in Louisiana, would sometimes talk about Six Flags Over Texas.  And I would talk about wanting to travel to other amusement parks around the country.  Places like Cedar Point, popular Six Flags parks and Universal Orlando.

Now if it was something I wanted to do, it would be to travel to different amusement parks and write reviews about them on my blog.  I would like to do a road trip from Minnesota to Ohio.  Making stops at Wisconsin Dells, Six Flags Great America, Cedar Point and Kings Island.  I would also like to someday fly down to South California and visit the Disneyland Resort, Knotts Berry Farm and Six Flags Magic Mountain.  I would also like to visit Universal Orlando for the first time and go back to Six Flags Over Texas.

Now from what I've seen on the internet, Six Flags Over Texas has changed quite a bit.  The most notable changes since I was there (back in 2005) would be the addition of a spinning coaster as well as the Texas Giant being transformed into the New Texas Giant, the removal of an old shuttle coaster named Flashback, the trains on Mr. Freeze are now facing backwards which renamed the ride Mr. Freeze Reverse Blast and finally, the Texas SkyScreamer which stands at 400 feet tall making it the tallest ride at Six Flags Over Texas.

So yeah.  Maybe someday I might just have enough money to travel to different theme parks and be able to write reviews about them.  And maybe someday I could also make that into a living.

That's all I have for now.  Thanks for reading.

Sunday, February 2, 2014

My 3 coaster idea + my Trip to Kings Dominion in 2011

So I'm currently working on a three coaster project.  All of them are Intamin AG styled.  The three coasters are Runner-Up, Legend, and Epic. 

Runner-Up is a Mega-Lite Coaster based off the ones built in 2008 and 2009.  It is teal track with grey supports and two orange trains.  It is around 100-105 ft tall and goes around 50 mph.

Legend is a Mega Coaster based of the ones built from 1999-2003 (mainly 1999-2000).  It is magenta track with grey supports and two blue trains.  It is 207-208 ft tall and goes 75 mph.  It is over 5,000 ft in length and has a super large helix.

Epic is a Giga Coaster based off of Intimidator 305 built in 2010.  Not much of it is complete yet.  However I know it's 305 ft tall and goes 90 mph.  Also, it is grey track with gold/orange supports and two gold/orange trains.


The three roller coasters together.  Note:  Project is not completed yet.
Now in an earlier post, I was talking about the inspiration for the Giga Coaster.  I was there to ride it.
 
Intimidator 305.  The inspiration for Epic.

Now the trip I took to Kings Dominion I believe was back in 2011.  During summer vacation, me and my dad went to Washington DC for a few days to see the National Mall and a few other things.  A few days before we left, we were talking about the Intimidator 305.  I looked it up on the internet.  My dad asks me where it is, I reply with Virginia.  So my dad thought it might be fun to go to Kings Dominion since it is only around an hour away.
 
I look up Kings Dominion and then another park in Maryland called Six Flags America.  The Six Flags park was closer to DC.  However some of the rides did not look as good as the ones at Kings Dominion.  What also made my decision was the Intimidator 305.


 Me on the Eiffel Tower observation deck
 
So me and my dad decided to go to Kings Dominion after all.  We had the first few days in DC.  Then on the last full day, we got a rental car and drove down to the park.  It's just off of Interstate 95 in a little town named Doswell.  Kings Dominion is home to 14 roller coasters and also has a 1/3 scale Eiffel Tower replica standing at over 300 feet tall.  The only other amusement park that has an Eiffel Tower replica would be Kings Island in Ohio.
 
Now some general information about Intimidator 305 would be its height of 305 feet, top speed of 90 mph, and is 5,100 ft long.  Intimidator 305 is also known for its high speed turns and twists as well as those short moments of airtime. 
 
An interesting story about this ride would be its first turn.  When Intimidator 305 opened in 2010, riders have experienced blackouts while riding.  This happens on the first turn of the ride due to how strong the G-forces are.  The turn looks wide, but it is tight enough where G-forces get really strong.  Strong enough where your vision goes black or grey.  The first idea to resolve the issue was to add trim brakes on the first drop.  Slowing down the ride from its original speed of 92 mph to somewhere around 80 mph.  Didn't work.  During the off season, the first turn was re-profiled and the trim brakes were removed.  This brought the ride back to a top speed of 90 mph.  I was there after the turn was re-profiled.  Still, the G-forces were strong enough where I was blacking out.  And let me tell you, this was the only roller coaster I've ever been on that has blacked out my vision.
 
Intimidator 305 & Anaconda.
Volcano, The Blast Coaster.
Dominator.

 Shockwave.
 
Now my personal top five coasters at Kings Dominion would be:
1.  Volcano, The Blast Coaster
Pros:  It is a very interesting theme.  I like how you shoot out the top of the volcano.
Cons:  The ride was too short and the line got too long.
2.  Intimidator 305
Pros:  Super fast.  It whips you around corners.  Obviously, one of the best rides at Kings Dominion.
Cons:  I blacked out on the first turn due to strong G-forces (kind of a pro than a con to me).
3.  Dominator
Pros:  The track is underneath you with no floor for your feet.  There's also many Inversions.
Cons:  Over the shoulder restraints.
4.  Flight of Fear
Pros:  It is completely enclosed and is dark inside.  Has a really tangled and knotted layout.
Cons:  I barely fit under the lap bar.  It was only locked in by like one or two clicks.
5.  Shockwave
Pros:  You stand up while riding.
Cons:  Old and rough.  And again, barely fit into the harness.
 
It was a super fun day and it was the highlight of my DC trip.  If I ever go back to Washington DC however, I'm going to spend more time seeing the city's history instead of visiting an amusement park because I kind of missed out on some rich American history.  But you know what?  Kings Dominion was well worth it.
 
I'll get working on my project now so I can show you the finished product later on.  That's all I have for now and thanks for reading.